Showing posts with label crafting. Show all posts

Sunday, June 3, 2012

How to - Baby Shower or Wedding Guest Book Keepsake

Hello Again!

My last post was a summation of the sweet Baby Shower that I threw for my close friend.  One of the sad things about baby showers, wedding showers and the like, is that, when they are over, they are over.  I love the idea of guest books, and the beautiful cards that people give to the mother or bride to be, but they are just not an easy item to constantly review and remember!  Instead, we wanted something that could be displayed and be a constant reminder of the good times and the people that love us.  For my wedding shower, my mother did a similar thing to this tutorial, but used little foam hearts and put magnets on the back to be used as refrigerator magnets in our new home.  This tutorial will show you how to create a personalized keepsake using guest participation that can be hung or displayed any where in your home, to help you remember your celebration.

What You'll Need:


Cricut or Paper Punch.  For this project, I used a Cricut machine to cut out my 2" hearts.  This can also be accomplished with a paper punch that can be purchased at Hobby Lobby.  For those using a Cricut, I used the Doodletype cartridge.  I had found only a few cartridges that even cut out simple hearts, and the one I liked the best was the Doodletype heart.


Cardstock.  You will need card-stock or heavy paper of your choosing to cut your hearts out on.  I personally really love the Colorbok brand Pearlescent Paper, which I used in light lavender, to go along with her room theme.


Frame.  You will need a frame the size that you would like to end up with.  I chose a 16x20, which I thought was a nice large size, without being too big and bulky.

Self-Sticking Mounting Board.  I purchased this at Hobby Lobby, in the framing section.  It is absolutely perfect, as it is just a sticky board, in the same 16x20 size, that you can stick anything you like to.  It was great because I didn't need to trim it at all!

Nursery Story Books.  We chose to include, as an added sweet factor, pictures and excerpts from the Mommy and Daddy's favorite childhood stories.  I went to our local low price book store and purchased older, used copies of the storybooks to cut up and include.  The storybook I found didn't have many pictures, so I also went out and found two storybooks from their choices that had similar coloring and artistry types, so that they would go well in the frame.


Scissors and a simple background fabric.  To keep the collage from looking too stark and harsh, I decided to use as a backdrop a simple ivory colored piece of muslin.  I purchased a half a yard, which was plenty to cover my sticky adhesive board with.

Now you are ready to start!

Cut out your hearts.  Prior to the baby shower, or wedding shower, you will want to cut out your hearts out of your paper.  Cut out as many as you think you will need:  for the frame I did, I used 54 hearts total.  I had cut out about 50 just to be safe, and make sure that everyone who was attending would have the opportunity to fill out a heart.


Make your hearts an activity at your shindig!  There are quite a few ways to do this:  one of the more interesting ways I have heard of is to send the hearts in the invitations, and ask people to think about them and return them to you at the shower.  What we opted to do (because we had already sent the invitations) was to have the hearts as a side activity at the shower.  We had the blank hearts laying in wait, and an apothecary jar decorated with a tag explaining the purpose, ready to catch the completed hearts!


Cut out your hearts from your pictures and your stories.  This was probably one of the more difficult steps, largely because I wanted to have the hearts expose certain parts of the story, or the picture.  For this, it was just being careful with each and every cut.  The book I had had an adorable little ornate letter to start each story, and I really wanted to use that to show where one story started and stopped.  As I was placing the hearts, I kept each storyline kind of in order, and so the ornate letter was perfect!


Be careful!  When you are cutting your hearts on your Cricut, if you are using the free-movement function, be careful that you do not cut the perfect heart and then cut another perfect heart right on top of it!  I did that, and you can see the end result:  both hearts were ruined.


Iron your fabric.  This is important, because you don't want a single wrinkle when you place the fabric on the sticky board.  I found the best way to do this was to spritz my fabric with a spray of water before ironing it.  I first cut the fabric to about an inch longer than the 16x20 sticky board, and then ironed it.

Stick your fabric to your sticky board.  The best way I found to do this was to stick your fabric on from the center and smooth it outwards nicely and taughtly.  It was pretty easy to do... the board is sticky but not so sticky that you can't readjust.  Once you have pulled your fabric nicely so that you have a smooth, simple surface, trim the edges to about 1/2 inch.


Collect all of your hearts, and figure out placement.  I first placed hearts lengthwise and then widthwise to multiply and figure out how many hearts I would need total.  For a 16x20, I used 54 hearts total.  Of course you will use all of the hearts that people had filled out for your bride or mommy to be.  Once you subtract that, you will know how many hearts you have left to use for stories and pictures.  I split the remainder evenly to have an even amount of pictures and story hearts. I also had four different colors of written on hearts, so I separated those for perfect placement.


Place your hearts.  Once you have all of your hearts figured out, start to place them.  I figured out how many of the written hearts I would have per row (3 for my board) and then, because there were six per row, I placed them in alternating spots, also alternating the colors.  I then placed the picture and story hearts down, alternating rows with two stories and one picture, and one story and two pictures.  This is just a loose placement, so don't worry about being a perfectionist.  I was mainly looking at colors and styles to make sure that nothing clashed, and that everything kind of worked together.


Use double-stick tape to 'permanently' place your hearts.  The double stick tape allows you to move the hearts easily while keeping them still and stuck in place as you work around them.  Simply stick about an inch long piece on the back of your heart, and try to avoid wrinkling of the tape.  Then stick it in place.  The best way I found to do it was to start in one of the corners, and then place the hearts along the longest side, spacing them exactly how you want them.  I placed all of my hearts 6/10 of an inch from the edges of my board.  Once I had the one side done, I worked up from the bottom and down from the top, keeping the rows aligned.  Working outwards to the inside allowed me to make sure that everything was aligned the best I could!


Place it in your frame, and voila!  Once you are done placing your hearts, simply put your board in your frame (make sure you put it right side up!).  And you are done!


Enjoy!  If you have any improvements, questions, suggestions, please let me know!  I hope you enjoy your new keepsake!

Yours in Beauty and Love,
Marijke

Saturday, April 28, 2012

DIY Easy Headband Storage

Hello again!  

As I have had three craft fair booths every Saturday for the last three weekends, I am a little pooped!  Boy, oh, boy!  Crafting CAN get busy!  Anyways, because of that, I figured that I would add on to a previous post, and post a tutorial on Easy Headband Storage!  I made mine to match the ones in my previous post, so that they can all sit prettily together in my craft room!
What you'll need:

A ribbon of your choosing.  I chose a black and white ribbon reminiscent of the old french style.  I like to call it my marie antoinette ribbon!  It is an inch wide, which is just perfect for my flowers.  It also matched my reupholstered sewing table stool, and the memo board I made to match.  You will need to make sure your ribbon is wide enough for the clip to get a grip on, and that you buy enough for the lengths you want.  I bought two spools to start, and have since bought 4 more (though I have them on two walls now).  Also, a hardier ribbon, perhaps of cotton or a blend, is much better than those beautiful sheer ribbons.  Clips will tend to pull on the sheer ones and leave unsightly marks.

Earring hoops.  These can be found at any hobby shop (I use Hobby Lobby), in the jewelry making section.  You can get any shape you like; I personally love the teardrop shape.  You will need to purchase enough for the amount of ribbons you want to make, one per ribbon.

Sewing machine, matching thread, scissors, nails and a hammer.  If you would like, there is minimal sewing, so you can hand sew them.  I personally find it much easier to use my machine. 


Now you are ready to start!

Cut the ribbon to your desired lengths.  This is one of the more important parts.  You will want to hold your ribbon up in the spot you would like to hang it, and determine the length you want.  Allow approximately an extra inch on each end, and an extra half inch for each headband loop, so an extra two inches total, plus whatever you will add on for the headbands.


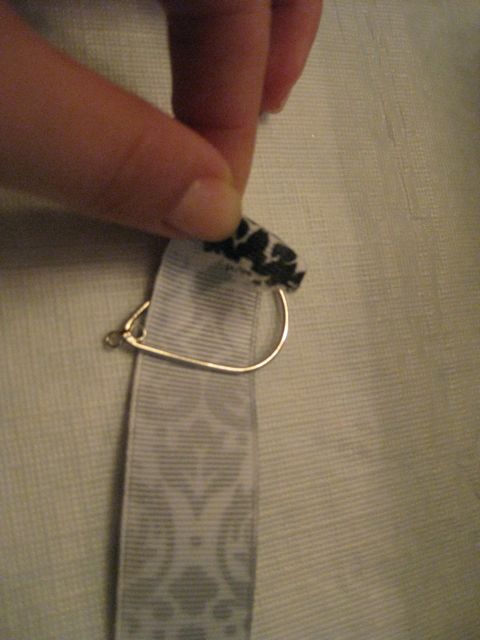
Place the ribbon through the earring hoop:  sew.  This step takes careful hands!  Simply pull your ribbon through your hoop.  Then, to create a nice, clean edge, fold the very end over on itself, and tuck it against the backside of the ribbon.  Your earring hoop should now be securely through the ribbon.  Simply run this through the machine, a single straight stitch (making sure that you also stitch through the folded under piece).  The only difficulty with this step is getting the folded under portion to stay folded under as you run it through the machine.  I also found that it runs through the machine easier if you turn the hoop to the side while you sew, with the straight edge running parallel to the sewing foot.


Make your Loop.  This is the part that you can play around with, staggering them to make them hang well on your wall.  Simply decide where you would like your first loop, and fold your ribbon over.


Now, simply sew a straight stitch across the loop.  I did mine a good half inch in, but I found that it did not hold the headbands in as tightly as they needed.  I would suggest stitching only a quarter of an inch in, which will give you a tighter loop.


Simply continue folding and stitching your loops.  Given that I was doing a few strands of these, I chose to stagger my loops, so that headbands would not hit each other, and I would be able to put the strands closer together.


Hem the bottom edge.  This is not a necessary step, but I find it makes it just a little nicer.  Simply do the same thing as you did at the top, without the earring hoop.  Just fold the bottom edge in on itself, and fold it over once more.  Run a straight stitch across it, and voila!  You are done!


You are almost done!


Hammer the nail in, hang your earring, and you are done!  If you are hanging more than one, I thought it worthwhile to use a level.  Simply use your level against the wall, mark your distances, and hammer the nails in!  I left a four inch space between each of ours, to allow for bigger headbands and flowers, but it is completely up to you!  Best of luck!  Let me know how it goes, and feel free to ask any questions you may have!


Yours in Beauty and Love,
Marijke

Sunday, April 22, 2012

DIY Easy and Elegant Baby Rattle Decoration

Hello again!  I have been bustling around the last few months preparing for the three craft fairs I have done the last three weeks... it does not leave much time for crafting.  However, with the exciting news of my friend's pregnancy, I have started looking for innovative and exciting ways to decorate for the baby shower I am throwing!  We will be using this design as our door decoration for the shower, and then putting it on her nursery door afterwards.  I saw something similar on Pinterest, and decided to give it a try.


When I decided to make it myself, I figured it ought to match both the Nursery and the Shower.  The baby shower colors are Lavender and Pearl, so I went to Hobby Lobby, and found my supplies.

Materials Needed:


Styrofoam Balls.  This will depend on the size you would like to make.  I chose a 6" and a 4" ball.

Plastic Dowels.  I found these in the cake decorating aisle.  You will want to have hollow plastic dowels, as they are both lightweight and easy to position in the styrofoam.  I did not do anything in addition to my plastic dowels, as the slightly pearlescent color was perfect, but you could, at this point, paint them.  You could also use wood dowels, with a little altering (You would have to carve out a little space for them into the styrofoam, though make sure to make it smaller than the actual dowel so that there would be pressure on the dowel to keep the styrofoam on once you put it into the ball:  this is not necessary with the hollow plastic dowels).

Scissors and Ribbon.  Pick a ribbon that matches your flowers or your theme that you are going with, or any other color that you prefer.  I picked a sweet lavender satin ribbon that was 1.5" wide, and two sheer ribbons, one in lavender and one in ivory, both 3/4" wide.


Flowers.  Choose faux flower bunches in your choice of color.  I chose petite tea roses in a sweet lavender. Each flower 'bouquet' that I bought had nine flowers on it.  I needed approximately 150 flowers to cover both balls (100 for the larger ball and 50 for the shorter ball), so I bought enough 'bouquets' to cover that.  I also used two slightly different flower bunches, to give a little bit of a variegated effect.  My flowers were all approximately an inch in diameter.  You can choose any size flower you would like, but keep your flower size in mind as you choose your brad size (next).

Brads.  I chose to use mini heart brads with little pearls at their center.  They were on the very small size, as brads go, but they were perfect for my mini tea roses.  Keep in mind, if you choose a large flower, you will want a larger brad.  I went through five and a half boxes of 25 brads for the whole project.

Pull your flower 'heads' off of the 'bouquets'.  In preparation, remove the flower buds and heads from off of their bouquets.  I have never seen flowers sold apart from the bouquet, but if you do find them, you can skip this step.

Make a starting point.  Now we are ready to get started!  Simply take your dowel firmly in hand, and stick it into the styrofoam ball.  Do your best to go straight in, and do not wiggle the dowel around as you do so. This will ensure that the styrofoam has a strong hold on the dowel, and that the ends will not fall off.  It is up to you how far you would like to stick the dowel in.  I went in about 2", and have had no problems with that.  Now, remove your dowel the same way you stuck it in.  You should see a clear ring where your dowel went in.  You will leave this space uncovered with flowers, and reattach your dowel there once you have covered the ball.


Disassemble the flower.  Next, we simply disassemble the flower heads.  You will want to do this one at a time, as you go, so that you do not get petal bunches mixed up.  It is generally rather simple:  flip the flower over and pull the plastic backing off of the 'stem'.  Then, remove the flower petals from the stem by sliding them off the back.  Keep them in the order they were on the stem, for best effect.  Do not rip the off of the stem or cut them: this is an exercise in finesse, though you will find it pretty easy for the most part.  You are trying to replicate the exact same look, while only changing the center.

Poke your flower into the styrofoam.  Now it gets both easy and tedious :-).  Take a brad, and stick the metal prongs through the hole left by the 'stem'.  Then, without messing with the prongs at all (in fact, sometimes I straighten them even further), poke them straight down into the styrofoam.


Rinse and Repeat.  Simply continue the last two steps until your ball is covered.  A few tips:  If your brad does not stay in (this will happen once in a while), simply pull it straight out and move it over slightly.  Also check your brad prongs;  if they are not straight and smooth, they will create a bigger hole than necessary, and will fall out easier.  Remember to leave a hole for your dowel (as pictured below):  I had my flower petals mostly covering the hole so that when I inserted my dowel, it would cover the base.


Once I had gotten a fair bit covered, I decided to reattach my dowel and use it to hold the ball.  This made it easier to attach my flowers as I went on.  (When doing this for the second ball, remove the first ball so as not to ruin it while you work on the second.)


When you have completed your first ball, repeat the last few steps for the second ball.  Then, simply attach both flower covered balls, position them as close or far apart as you would like to make it look like a rattle, and you are done with the hard part!


Attach your ribbons in a sweet bow.  As long as you can tie a bow, you are safe!  You have a few options here:  write on the bow, tie it with all three ribbons, etc.  I simply tied the two sheer ribbons to the dowel, and then tied the bow on top of them, but you could also have a three layer bow!  The possibilities are endless, and it is all up to your own preference!


Congratulations!  You are finished!  I added a fourth, very thin, line of ribbon that I used to hang the rattle from my door.


Now you have a personalized bit of elegant door decor for a nursery, a shower, or just for fun!  Please let me know if anything was unclear or if there is anything I can do to improve this tutorial!  Thanks for reading!

Yours in Beauty and Love,
Marijke